Quick Start
(1) Start the backend
- Open the
backend.code-workspaceorcd src/server/services npm i- Read these instructions and install all the dependencies Readme
- Open a new terminal tab and run dapr
npm run dapr - Wait a few seconds then
npm run start - Wait for the gateway to start. you should see this message
1
🚀 Gateway ready at http://localhost:3999/graphql`.
- *NOTE It takes about 10 seconds to load while it launches a few services on different ports and the gateway. It uses nodemon to monitor changes file changes. It uses Docker containers to run Dapr Microservices for pub/sub/stateful/redis/service invoke/gRPC
- If you are debugging you can attach the vscode debugger
1
debug tab in vsode > choose `Debug PlastiCoin (services)` > green play button
http://localhost:3999/graphql - This should boot the GraphQL explorer (gateway.ts) and you need a token to query the api see GraphQL Explorer docs
(2) Start the Blockchain (* wip, can be skipped, optional)
- Open the
blockchain.code-workspace - Make sure you have Docker-desktop, Minifab and all the dependencies installed instructions here
- Initialize and start the network in Docker instructions here
- Start the gateway (debug/live reload)
- To start the application/backend/gateway.js you can simply goto debug in vscode and click
debug > "Docker Launch Debugging".
- To start the application/backend/gateway.js you can simply goto debug in vscode and click
- Later on, if the images are still in docker you can start the network with the
npm run netupandnpm run netdowncommands
(3) Start the Front End
Android
- Open the
frontend.code-workspaceorcd src/client/react-native npm i- Install the dependencies and copy the .env files as documented here
- make sure an emulator is running or preferably a device is plugged
- If this is the first time running I recommend opening the android project in android studio
to let gradle index and build automatically. Thereafter, you should be able to simply
npm run androidwithout android studio.src/client/react-native/android
npm run android(make sure this runs jetifier, newer versions of react-native do!)- In a new tab watch for typescipt errors
npm run watch
iOS
cd src/client/react-nativenpm icd ios && pod install && cd ..- Open the ios project with xcode
open ./ios/plasticoin.xcworkspace
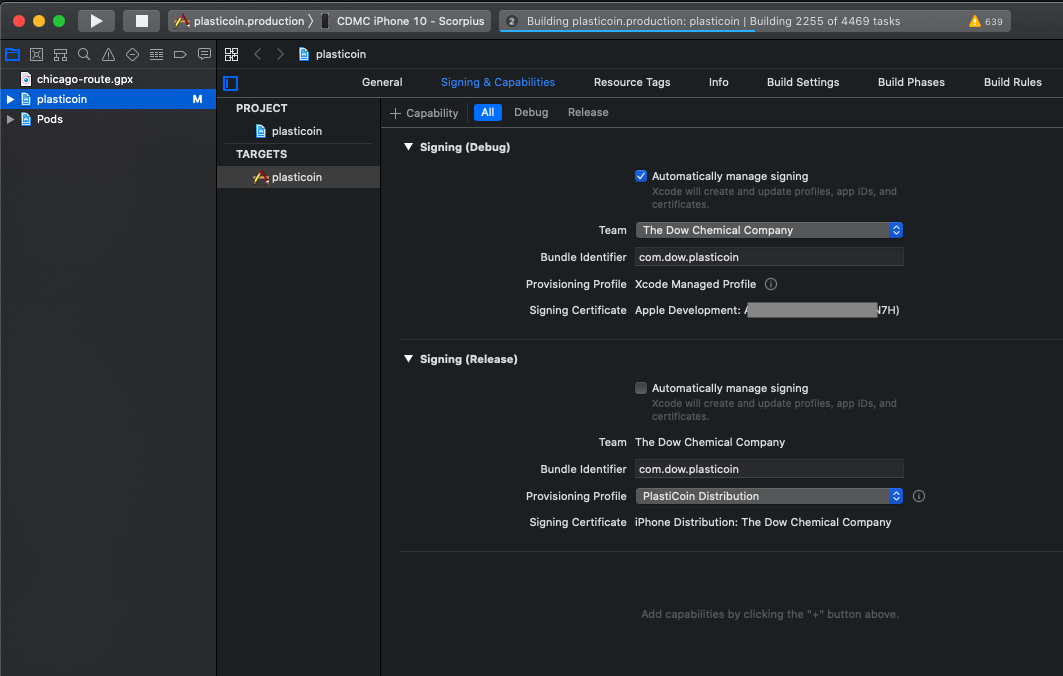
- make sure your mac has a developer certificate with an Apple developer account. Here is a good resource on how to do this: https://ionicframework.com/docs/appflow/package/credentials#ios-setup
- Configure your apple developer cert. This is to ensure you have the provisioning profile that links your ios phone to your develoepr cert to the app ID com.dow.plasticoin. It should look similar to this:
- If you are using Azure AD (defualt config does not use this..so you can skip) you must fix an Auth package, as noted here: https://github.com/FormidableLabs/react-native-app-auth/issues/296#issuecomment-525400686
- Make sure the pod files are installed for the package AppAuth
pod install - Open this file
src/ios/Pods/AppAuth/Source/OIDAuthorizationService.m - Comment out this block of code on line 124
1
2
3
4
// rejects URLs that don't match redirect (these may be completely unrelated to the authorization)
// if (![self shouldHandleURL:URL]) {
//  return NO;
// }
- Make sure the pod files are installed for the package AppAuth
- Run the app on the simulator
- you might need to clean the project
Product > clean build folder
- you might need to clean the project